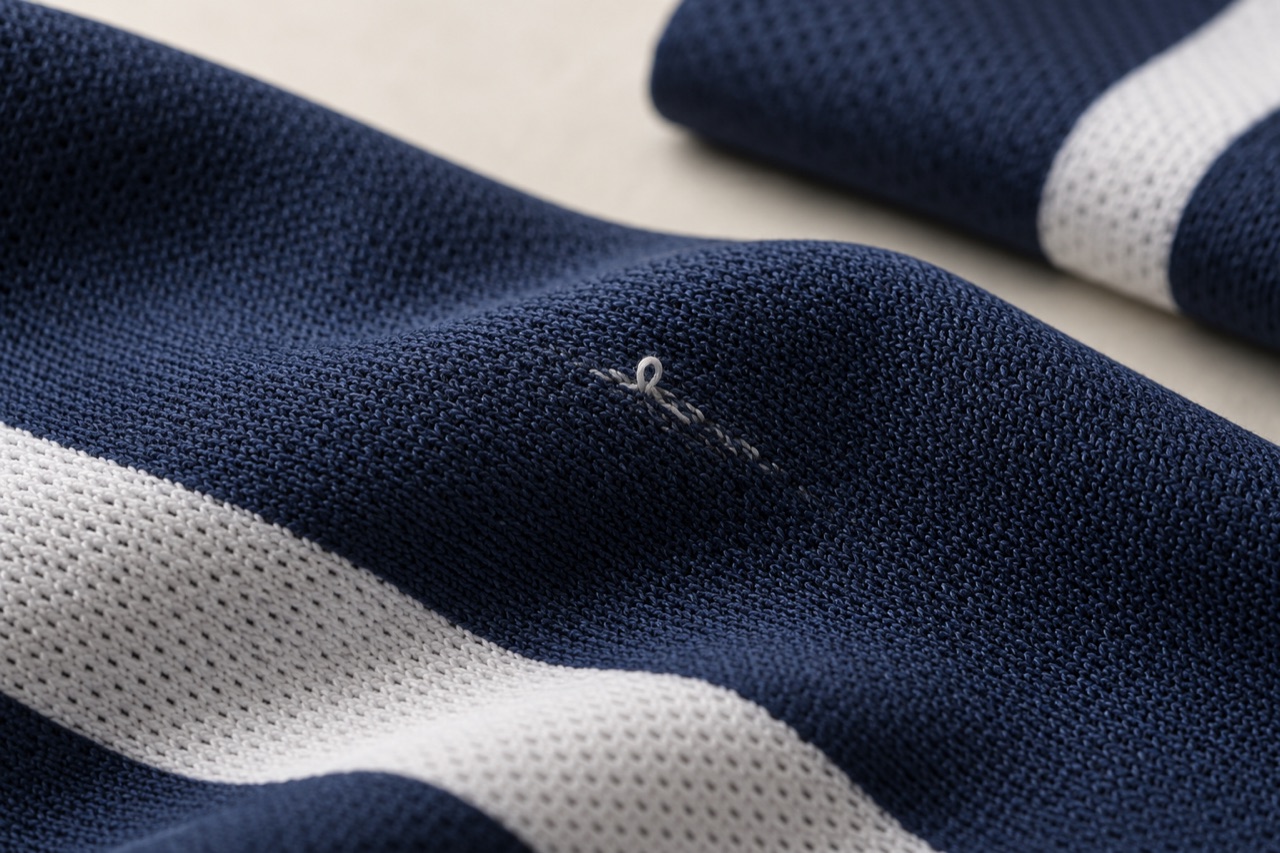
A tiny pale loop can be more noticeable than a much larger crease on a dark jersey. When several players report these marks after a game, it is tempting to blame either the printing or the laundry immediately. A closer inspection should come first.
Identify what has moved
Look for a loop standing above the fabric, a drawn line through the knit or an area where the structure has been disturbed. Those observations point toward yarn displacement or damage. A separate printed film lifting away from the surface is a different construction and a different failure.
Sublimation transfers dye into suitable polyester rather than adding a peelable film. In a dark design printed on a pale base, a disturbed yarn or a newly exposed part of the structure can appear lighter. The exact explanation depends on the fabric and print penetration; a white mark by itself is not proof of a printing defect. See the Sawgrass process description for the distinction between dye and a surface layer.
Separate damage from how visible it looks
A pale snag against navy will draw the eye differently from a similar mark against a pale pattern. That makes visual contrast part of the assessment, alongside the number of snags and the extent of distortion. ASTM’s discussion of snagging resistance explicitly considers these appearance differences.
For a useful comparison, photograph the whole garment, the affected region and a close view under consistent lighting. Include an unworn sample of the same fabric and colourway. A dramatic macro image without scale can make a small flaw look catastrophic; an overall photograph can hide it completely.
Snagging, pilling and abrasion need different questions
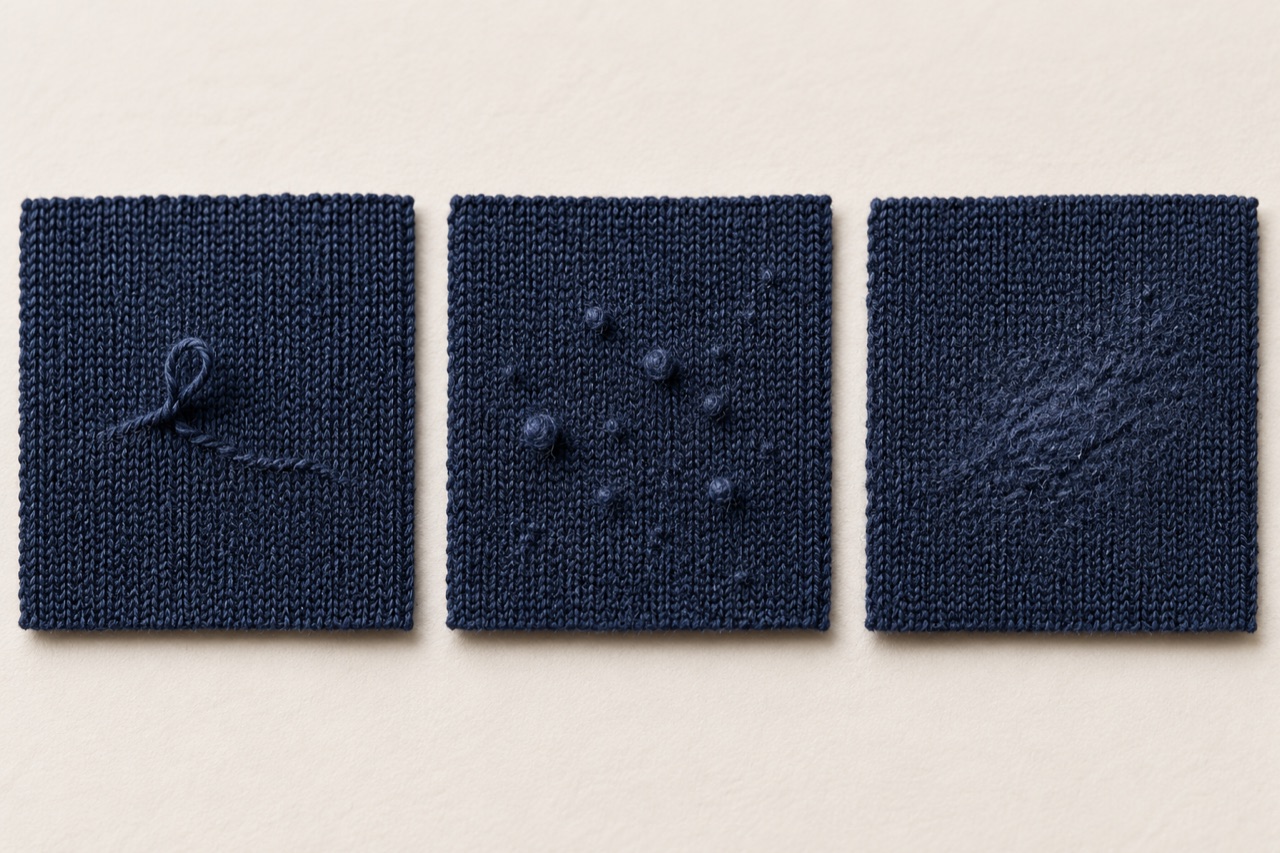
A snag involves a pulled or displaced part of the textile structure. Pilling describes small balls of entangled fibre at the surface. Abrasion concerns wear from rubbing. They can occur together, but a result for one should not be substituted for evidence about the others. ASTM lists distinct methods for these properties in its textile testing overview.
Fabric weight is also an incomplete shortcut. A heavier sample may feel more substantial without answering how its surface behaves when caught or rubbed. Examine the intended fabric construction and its actual performance rather than treating a GSM figure as a durability grade.
Investigate the pattern of the complaint
Map where the marks appear: across the chest, at the side, near a bag strap or scattered over the garment. Record whether they appeared before washing or afterward. Examine storage, equipment contact and exposed fasteners as possible contributors without assuming any one of them is responsible.
If several shirts are affected, retain examples and compare them with the unused control. Similar damage on several garments warrants investigation, but does not on its own identify a defective roll or a care error.
What a white mark can—and cannot—tell you
Colour is often the first thing the wearer notices, but it is not the first thing the technician should classify. Begin with the physical form of the mark. Is there a loop above the surface? A line of displaced stitches? A fuzzy patch? A deposit sitting on top of the fabric? Several different conditions can appear as a pale spot in a photograph of a dark shirt.
Use ordinary magnification and good lighting to document the structure without pulling at it. View the face and reverse where accessible. Note whether the mark follows a visible direction in the knit or crosses it irregularly. This does not provide a complete laboratory diagnosis, but it helps separate observations from the first explanation someone suggested online.
If there is no raised or displaced structure, keep other explanations open. Residue, local colour differences and surface damage need different investigations. Do not label every pale line “snagging” just because similar-looking marks appear in a social media discussion. The description should follow the sample in front of you.
The same caution applies to blame. A mark appearing after one game does not automatically mean the fabric was defective, and a mark near equipment does not prove misuse. The useful question is which combination of material, garment design and exposure produced the observed change. That question remains answerable only if the evidence is preserved before attempted cleaning or repair alters it.
Learn to see the knit beneath the graphic
A sublimated jersey is both an image and a textile structure. The artwork can make the surface look visually continuous even though it is built from yarn loops and openings. When a loop is displaced, the viewer may suddenly notice a part of that structure that was previously inconspicuous. The print design and the fabric therefore need to be examined together.
Look at an unused swatch from the actual fabric reference. Observe the face, reverse and cut edge without treating the reverse colour as a pass-or-fail rule. Different constructions and print processes can produce different appearances. Ask the print specialist to explain the expected result for that material instead of assuming that every yarn must look identical from every direction.
Then compare the damaged area with an undamaged region of the same garment. Does the pale feature appear only where the structure has moved? Does the surrounding print remain clear? Is the visible change associated with an isolated protrusion or a broader disturbance? These observations help frame the next technical question.
Avoid turning “deeper printing” into a universal cure. The development team still needs to consider the fabric surface and the kind of exposure involved. Colour appearance and resistance to mechanical disturbance are connected in the finished product, but they are not the same property. A convincing correction must address the observed mechanism rather than simply make the initial dark colour look stronger.
Snagging, pilling and rubbing leave different clues
A useful sample review gives each surface condition its own description. For a snag, record a protruding loop or the visible displacement of the structure. For pilling, record the small fibre balls and their distribution. For rubbing-related wear, describe the affected area, any fuzziness and any loss of the original surface character. If several conditions appear together, record all of them.
Location helps make the description more precise. A broad fuzzy region beneath a strap is a different observation from one long pulled line at the lower hem. Several tiny pills around a contact area should not be counted as several pulled yarn loops. The distinction matters because the next evaluation should investigate the relevant behaviour.
Photography needs to show both scale and structure. Include a wider view with a scale reference nearby, then a close view that reveals the surface. Keep the lighting direction consistent between candidate fabrics. Raking light can make raised features easier to see, but it can also exaggerate differences when only one sample is photographed that way.
For development records, use neutral descriptions before assigning a cause. “Three visible loops near the right side seam after the wear session” preserves more useful information than “weak fabric.” It allows another reviewer to examine the same evidence and ask whether the next step should concern snag resistance, construction contact, equipment interaction or another part of the product.
Dark colours can make a small disturbance conspicuous
A product can change very little physically and change a great deal visually. A pale protrusion on a dark solid panel may be immediately noticeable, while a similar disturbance within a light or broken pattern is harder to see. That does not mean the lighter design has stronger fabric. It means the appearance assessment includes contrast.
When comparing colourways, inspect the same type of surface change under the same viewing conditions. Record both the structural observation and how obvious it is at a normal viewing distance. A macro photograph is useful for diagnosis; a full-garment view is useful for understanding the wearer’s complaint. Neither should replace the other.
This distinction can inform design without becoming an excuse to hide defects. A club may reasonably choose a dark solid jersey because that is central to its identity. The fabric and construction then need to be evaluated against the appearance expectations of that design. A busy graphic is not a substitute for appropriate material performance.
Similarly, avoid ranking samples only by the number of obvious white marks. If the candidates use different colours, the visible count may reflect contrast as well as damage. For a direct material comparison, use a consistent design where practical. For final product approval, review the actual colourways separately, because the wearer experiences the finished appearance rather than an abstract fabric score.
Why fabric weight is only a starting description
Fabric weight is useful for identifying a material and comparing its overall substance. It does not describe every feature of the exposed surface. Two jerseys with similar GSM can differ in texture, openness, yarn appearance and the way the structure responds to contact. Conversely, a heavier fabric is not automatically the better answer to a particular snagging complaint.
At the sample table, examine the face under consistent light and gentle handling. Is the surface smooth or visibly textured? Are there prominent loops or patterned areas? Does the reverse differ substantially from the face? Record these features rather than translating them immediately into claims about durability. Their relevance must be established through suitable evaluation.
Also consider where each fabric is used. A ventilating side panel, a broad chest panel and a sleeve may encounter different movement and contact. If the shirt combines materials, identify the panel in which the marks occur. A complaint about one panel should not automatically be assigned to every fabric in the garment.
The next material choice should respond to the actual brief. If a different construction is proposed, review its hand feel, appearance, coverage and movement as well as its relevant surface performance. Solving a snag concern by choosing a much heavier fabric may create an unwanted playing feel. The development decision should make that tradeoff visible instead of treating weight as a universal durability shortcut.
Map contact points before changing the fabric
Draw a simple outline of the garment and mark each affected location. Separate left from right, front from back, and body panels from trim. A pattern may emerge: concentrated marks at one shoulder, repeated damage near a closure, or scattered disturbance across several panels. The map helps identify questions worth investigating without claiming that location alone proves the cause.
Review the equipment and clothing used with the jersey. Consider straps, exposed hook-and-loop fasteners, rough edges and other surfaces that may contact it. Inspect these items rather than assuming they are damaging. A suspected contact point is a hypothesis until the relevant interaction has been examined under an appropriate review procedure.
Include dressing, transport and storage in the history. A jersey can contact other materials before it reaches the field and after it leaves. If the mark was first noticed after laundering, establish whether the garment was checked beforehand. “Noticed after washing” and “created during washing” are different statements.
This does not shift responsibility away from the product. Intended use includes foreseeable interaction with the wearer’s normal equipment. The purpose is to understand that interaction well enough to choose a suitable fabric or construction. Where a contact issue can be reduced through a design change, evaluate it. Where the material itself needs improvement, the same evidence helps specify a more relevant comparison.
Read a laboratory result as a method-specific result
Before requesting testing, explain the garment construction and the observed problem to the laboratory. Supply the actual fabric and relevant use context. Ask which method is appropriate and what the result will describe. A familiar standard number is not automatically suitable for every mesh, knit or finished surface.
When reviewing a report, identify the tested material, method version, specimen preparation and reported conditions. Confirm that the result belongs to the fabric under discussion rather than an older reference with a similar trade name. If the final garment uses more than one construction, establish which panels the evidence covers.
Keep the interpretation within the method’s scope. A laboratory appearance rating is not a forecast that a jersey will survive a certain number of matches without a visible mark. Nor does it automatically explain a specific field complaint. The report can inform material selection while the garment review addresses placement, fit and equipment interaction.
Do not invent a universal pass threshold in an article or product brief. The appropriate acceptance criteria depend on the intended product and the agreed evaluation. Where a method has limitations, preserve them in the discussion. A useful laboratory conversation ends with a result the development team understands, including what remains untested, rather than a score used as a broad marketing badge.
Design a wear review around a specific question
A wear review becomes more useful when it has one clear question. For example: does the revised side panel show a different surface response during the intended training session? Keep the garment fit, activity and relevant equipment as consistent as practical. If several conditions change at once, record them so the result is not overinterpreted.
Photograph the garment before use and identify any existing marks. Ask the wearer to note unusual contact rather than inspect the shirt obsessively during play. Afterward, map the observed changes and review the garment before laundering. If a care sequence follows, document it as a separate stage so the timeline remains clear.
Include more than one relevant wearer or session when the decision requires broader evidence, while avoiding claims of statistical certainty from a small informal exercise. Differences between users can reveal useful contact patterns. They do not automatically establish which material is universally superior.
Keep the review humane and realistic. There is no need to create extreme damage with sharp objects to make the comparison dramatic. An improvised destructive demonstration may bear little relationship to use and can mislead the decision. For controlled mechanical assessment, work with a competent laboratory. For garment development, focus on repeatable observations under conditions that actually matter to the product.
A worked example: pale lines near a shoulder strap
Consider a hypothetical dark training shirt with several pale lines near one shoulder after a session. The wearer used a bag before and after training. It would be easy to conclude that the strap caused the marks, but that conclusion is premature. The first task is to document the lines and establish whether they are displaced yarns, rubbing-related change or another surface condition.
Compare the affected region with the opposite shoulder and an unused sample. Review the bag’s contact surfaces and the timing of the observations. If the shirt was not inspected before training, preserve that uncertainty. The bag is a candidate contributor, not a proven cause simply because its strap occupies a similar location.
The next development comparison could evaluate an alternative fabric in the same shirt design while recording the relevant use conditions. Another comparison might examine a revised equipment-contact arrangement where that is part of the intended product system. These are separate questions and should not be mixed into one uncontrolled trial.
If a candidate performs more satisfactorily in the documented review, retain both the positive result and its limits. It may support a material choice for this garment and use context. It does not justify claiming the fabric cannot snag. The value of the exercise lies in connecting a visible complaint to a better-supported design decision.
Does a snag mean the jersey is about to develop a hole?
Not every visible protrusion has the same structural significance. A photograph of a pale loop cannot establish how the surrounding yarns have been affected or predict the garment’s remaining life. Inspect the actual sample and distinguish appearance change from broken yarns or an opening in the structure.
If a hole is present, record it separately rather than combining it with the snag count. Its location, dimensions and surrounding condition deserve their own examination. Where the consequences matter to product acceptance, ask a competent textile specialist to assess the construction and select appropriate further evaluation.
For editorial language, avoid both extremes: dismissing every snag as purely cosmetic or presenting every pale mark as imminent failure. The useful explanation acknowledges the observed condition and the limits of what that observation can establish.
Preserve the evidence before attempting a repair
A protruding loop invites an immediate response: pull it back, trim it or press it flat. Before doing any of those things, photograph the condition and preserve a representative sample if the issue is being investigated. Altering the mark can remove information about the original structure and make later comparisons harder.
Do not prescribe a universal repair from an image. Whether a particular intervention is appropriate depends on the fabric and the damage. Pulling a loop further or cutting a yarn can change the garment in ways the photograph does not reveal. Product-specific care or repair advice should come from someone who can assess the construction.
For a recurring complaint, keep the untouched example separate from samples used for experiments. Label the stages clearly: received condition, inspected condition and any later treatment. This simple distinction prevents a repaired or manipulated garment from being mistaken for the original evidence.
The development goal is broader than making one mark less visible. It is to understand whether the material, design or expected interaction needs revision. A retained sample, a location map and a clear use history often contribute more to that decision than a dramatic before-and-after repair photograph. They keep the discussion anchored in the product rather than in assumptions about the printing or the wearer.
Choose an evaluation that suits the fabric
A snagging test is not interchangeable across every construction. The current ASTM mace-method scope excludes certain open constructions and notes limitations for shipment acceptance. A competent laboratory should select an appropriate method and explain what its result does and does not establish. ASTM D3939/D3939M-26.
For development, combine an appropriate laboratory assessment with a documented wear review. Agree what appearance is acceptable before comparing candidates. The aim is a jersey whose surface holds up to its intended use, with a design and construction assessed together.
Technical references and question evidence
- TechnicalSawgrass: Sublimation overview
- TechnicalASTM D3939/D3939M-26: scope and limitations
- TechnicalASTM textile testing overview
- Question evidence onlyBaseball team reports pale snags
Technical references support the discussion method. Question evidence documents public discussion of an issue; it does not diagnose a KITOEM product or establish a test result.