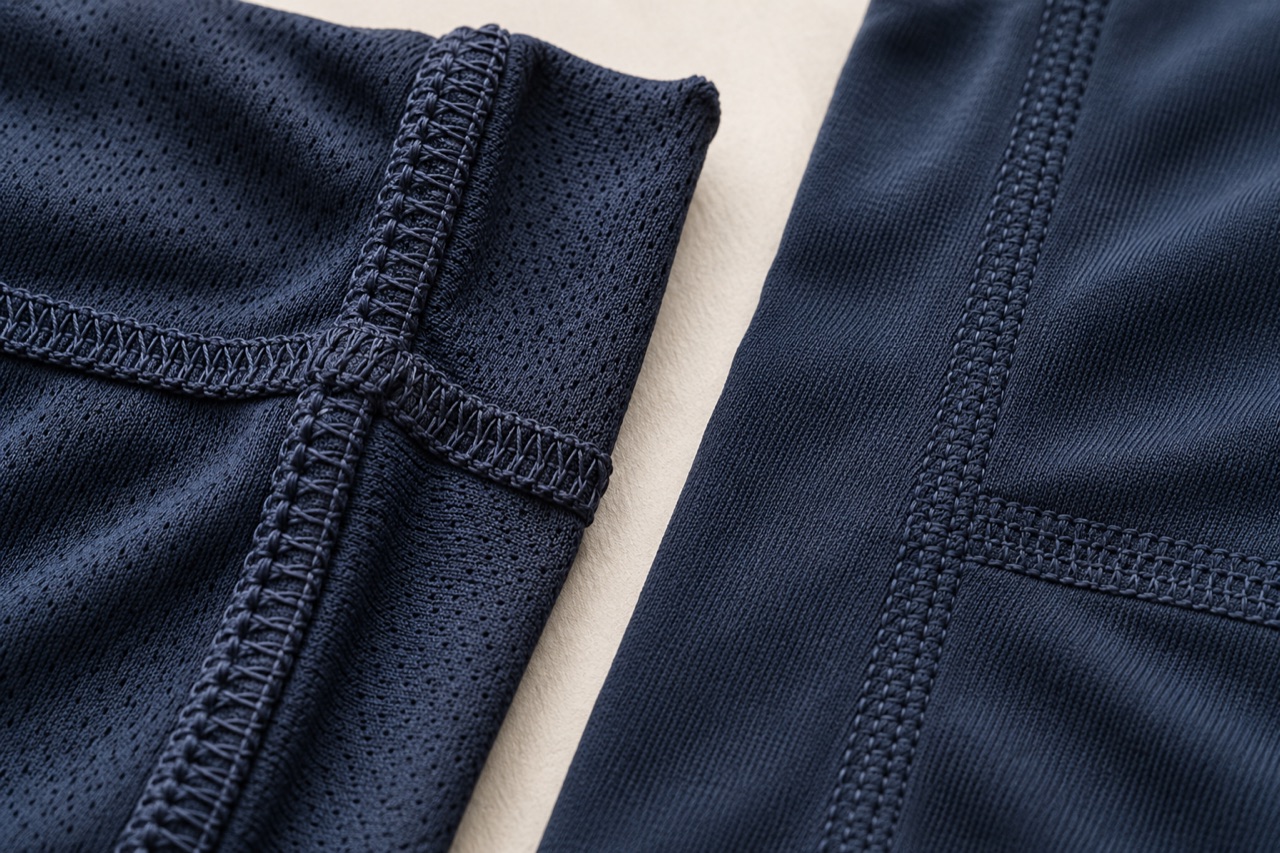
A training shirt can feel soft in the hand and still rub at the underarm after repeated movement. The irritation may come from a small junction where seams meet rather than from the broad surface of the fabric. Comfort needs to be reviewed at the places that actually contact the body.
Inspect the garment inside out
Begin at the underarm, neckline, side seam and any other area a wearer identifies. On shorts, include the inner leg, liner edge and waistband joins. Run a fingertip lightly across the seam rather than only along it. This makes changes in height and stiffness easier to notice.
Look particularly at intersections. A long seam may be comfortable over most of its length, while folded allowances, reinforcement or a join create a thicker point in one location. Record the exact location instead of labelling the entire fabric “scratchy.”
Flat appearance is only one part of comfort
Coats describes seam development in terms of strength, stretch, bulk and softness, including the feel of seams next to skin. These properties must be considered together. Its soft and secure seams guide is a useful technical reference.
A low-profile seam can still have an uncomfortable edge or sit in an awkward position. A raised seam may be acceptable where it has little skin contact. Neither the number of needles used nor a “flatlock” description proves that a completed garment will be comfortable for every wearer.
| Detail | What to examine |
|---|---|
| Placement | Whether the seam lies in a repeated contact or movement area. |
| Profile | The ridge, seam allowance and extra bulk at intersections. |
| Touch | Thread feel, trimmed edges, labels and backing near the seam. |
| Movement | Whether the assembly extends appropriately and returns without distortion. |
Check stretch in the assembly
A stretch fabric needs a seam system appropriate to its movement. Thread selection is one part of that system; Coats discusses controlled elongation and stretch-seam applications in its Eloflex technical information. The product reference illustrates the principle, not a requirement to use a particular brand.
Compare candidate constructions in the actual panel orientation. Inspect them during gentle movement and afterward for distortion, gaps or broken stitches. Do not pull a sample to an arbitrary extreme and call that a realistic wear test.
Use movement to find the contact point
Try the intended action: reaching overhead in a training top, repeated arm swings in a running shirt or controlled squats in shorts. Ask the wearer to identify a precise spot and the action that makes it noticeable. Recheck that spot on the inside of the garment.
Include different relevant body shapes and the intended fit. Record base layers, duration and dry or damp conditions. Feedback from one person is useful evidence for that person, not a universal comfort guarantee. Stop the trial if discomfort develops; continuing until skin damage appears adds no useful product value.
Soft fabric does not guarantee a comfortable garment
Hand feel is usually assessed across a broad, flat area of fabric. The wearer experiences a more complicated surface: seams, folded edges, labels, decoration backings and junctions between panels. A material can feel pleasant in the hand while one small part of the finished construction becomes noticeable during repeated movement.
Begin with the wearer’s location and timing. Does the sensation occur immediately, only when the arms move, or after the garment becomes damp? Is it concentrated at a single point or spread along an edge? These details help the product developer inspect the relevant construction instead of replacing the body fabric without evidence.
Use neutral language when recording feedback. “A firm ridge at the lower underarm junction becomes noticeable during arm swings” is more actionable than “the shirt is uncomfortable.” It identifies a physical feature and an activity. The next sample can then be reviewed against the same observation.
Do not turn this inspection into a medical diagnosis. Skin discomfort can have causes beyond the seam, and a garment review cannot establish all of them. The development task is to identify and improve relevant contact features while respecting the wearer’s feedback. Stop a trial when discomfort develops; there is no need to continue until visible injury appears to prove that a construction deserves attention.
A seam name is not a complete construction description
Terms such as overlock, coverstitch and flatlock can help identify a construction family, but product conversations do not always use them precisely. A visible line of stitching on the outside does not necessarily show how the fabric edges are arranged inside. Inspect the actual assembly before making a claim about its profile or contact feel.
Photograph both sides and the relevant junctions. Identify where the fabric edges sit, which allowances remain raised and how the thread presents itself to the wearer. If a formal stitch or seam designation is needed, have the technical team confirm it from the construction. Do not infer an exact stitch classification from a decorative product photograph.
Compare candidate seams on the intended fabric and orientation. A neat demonstration on a stable sample cloth may not represent the result on a light stretch panel. The construction should be judged as an assembly, including how it bends and extends in the garment’s actual direction of movement.
This is why a “flat seam” label should not finish the comfort conversation. The edge may still feel firm, the junction may still create bulk, or the placement may still bring the seam into repeated contact. The name describes part of how the garment is made. It does not establish how every wearer will experience it.
Follow the seam allowance, not just the stitch line
The seam allowance can form a ridge even when the visible stitching is neat. Turn the garment inside out and see where that ridge lies. Does it sit consistently in one direction? Does it change direction at an intersection? Is there a trimmed edge that feels different from the surrounding fabric? These details are easy to miss in an exterior review.
Touch across the seam lightly, then along it. Crossing the ridge can reveal a local height change that is less noticeable when a finger follows the stitch line. This is a simple screening observation, not a measurement of friction or a prediction of irritation. Use it to identify areas worth reviewing on the body.
Look for local irregularities rather than assuming the whole seam is uniform. A folded allowance, an uneven trimming point or an additional reinforcement can create a firmer area in an otherwise satisfactory construction. Photograph that point with enough surrounding context to locate it on the garment.
Any proposed reduction in bulk must preserve the seam’s required function. Removing material indiscriminately is not a sound development method. Ask the technical team to evaluate the appropriate construction change, then review strength, movement and appearance alongside contact feel. Comfort is part of seam engineering, not a reason to ignore the rest of the assembly.
Intersections deserve their own sample review
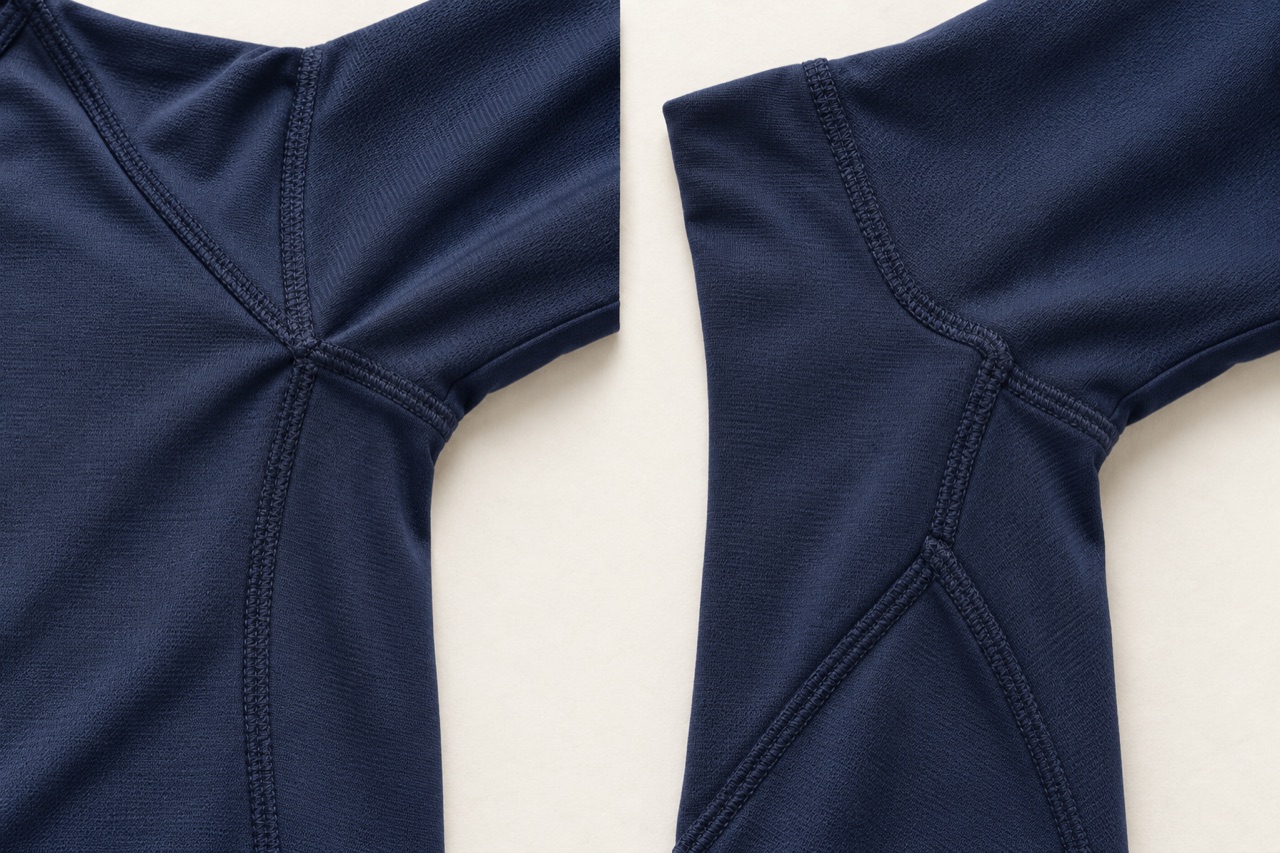
Where several seams meet, the garment can contain a concentrated stack of fabric, thread and reinforcement. The rest of each seam may feel acceptable, while that small junction is noticeably firmer. Underarms, crotch areas, waistband joins and panel transitions deserve attention for this reason.
Map the junction from the inside. Identify which edges and allowances arrive at the same point and whether there are additional labels, tapes or decoration layers nearby. A close photograph is helpful, but an overall view should show how the junction relates to the wearer’s movement. The same physical bulk may be more or less noticeable depending on placement.
Possible development routes include redistributing the junction, changing the panel arrangement or refining the way the allowances are handled. These are options to evaluate, not automatic improvements. Moving a seam can alter fit or create a new contact location. Reducing one stack can also change the appearance of the surrounding panel.
Compare the complete revised garment with the previous version. Ask whether the original point remains noticeable during the same movement, and inspect the new locations created by the change. The aim is a better overall assembly. A lower-looking intersection in a photograph is useful progress only if the garment still meets its movement, durability and appearance requirements.
Thread is a contact material as well as a joining material
Thread selection is often discussed in terms of sewing performance and strength. In a garment worn against skin, its exposed feel also matters. Compare the actual thread surface in the completed seam, including any dense or reinforced areas. A loose cone or sample strand does not reproduce the arrangement the wearer touches.
Observe whether a particular stitch region feels noticeably firmer than the surrounding construction. Check secure thread ends and any local finishing points. These observations should guide a technical review rather than an instruction simply to use the softest available thread. The chosen thread still has to suit the seam, fabric and intended use.
If a thread change is proposed, hold the rest of the comparison as steady as practical. Record the thread reference and the completed construction. Then inspect appearance, movement and contact feel together. A different thread can require appropriate sewing adjustments, so those changes should also be identified rather than hidden within the sample history.
Avoid universal claims based on fibre names alone. The wearer encounters a finished seam with a particular thread arrangement, not a generic material category. The useful decision is whether this thread and construction work satisfactorily in this location on this garment. Broader performance claims require evidence beyond a favourable first touch.
Stretch must be reviewed in the direction of use
A garment panel does not move equally in every situation. The seam may run along, across or diagonally through the direction in which the wearer places tension on the fabric. Review candidate constructions in their intended orientation rather than stretching a small sample in whichever direction gives the most impressive result.
Observe the assembly during relevant movement and after it relaxes. Look for local restriction, distortion, visible openings or damaged stitching. Record the specific condition instead of using a single word such as stretchy. The sample may extend adequately in one movement and feel restrictive in another because the garment geometry changes the load path.
Keep fit in the conversation. A seam can be asked to accommodate more movement when the garment is too tight in that region. That does not mean every concern should be solved by adding ease, but it means a seam review should not ignore the pattern. The material, construction and fit operate together.
Where measured extension, recovery or strength is required, define the appropriate assessment with a competent technical partner. An informal hand pull is useful for locating obvious differences, not for establishing a performance rating. The final decision should connect practical wearing observations with whatever technical evidence the product’s requirements actually demand.
Placement can matter as much as profile
A seam may be unobtrusive in one position and repeatedly noticeable a short distance away. The wearer’s posture, garment fit and movement determine where contact occurs. That is why a seam map should be reviewed on the body, rather than approved entirely from flat pattern drawings.
For a running top, observe the relationship between the underarm area and repeated arm movement. For shorts, review the inner leg, liner edges and waistband junctions during relevant actions. These examples identify areas to examine; they do not establish that a particular seam position is universally wrong for every wearer.
Ask the wearer to point to the location while the garment is on, then mark it on a drawing or photograph. A complaint described as “the side seam” may actually refer to a nearby label or a small intersection. Connecting the feedback to a precise construction point prevents unnecessary changes elsewhere.
If relocation is proposed, assess the new position as carefully as the old one. A seam moved away from one contact zone may affect panel shape, decoration placement or another movement. The best correction is often specific and modest, but it must be judged in the complete garment. Position and profile are complementary design variables, not competing explanations.
Damp conditions and duration should be recorded
Comfort feedback changes meaning when the conditions are missing. A shirt worn briefly in a fitting room provides different evidence from one worn during a full training session. Dry and damp conditions can also feel different to the wearer. Record these circumstances without assuming a universal response for every fabric or person.
For a development review, choose a relevant activity and a sensible observation period. Note the wearer’s base layers, garment size and the point at which a particular seam becomes noticeable. If the garment is damp, record that condition rather than treating it as an uncontrolled detail. Stop the session if discomfort develops.
Do not ask a wearer to endure an irritating sample just to complete a planned duration. Earlier feedback already identifies a product issue worth investigating. A shorter, well-documented review can be more informative than a longer trial in which the wearer compensates by changing posture or repeatedly adjusting the garment.
When comparing revisions, keep the conditions reasonably aligned and preserve differences that cannot be controlled. An improved report from one person is meaningful for that review, but it is not proof that the garment will never rub. The evidence should support a targeted design choice without expanding into a universal comfort promise.
Check labels, binding and decoration before blaming the seam
A wearer often identifies discomfort by region rather than by construction component. Near the side seam, the actual contact point may be a care label. At the chest, it may be the reverse of a crest. Around an opening, it may be binding or tape. Inspect everything in the reported area before deciding which part needs revision.
Turn the garment over and compare the contact surfaces. Look at edges, corners, attachment points and any change in stiffness. Ask the wearer whether the sensation can be located more precisely during a brief, comfortable fitting review. Do not continue provoking irritation simply to isolate a component.
A targeted correction may involve repositioning a label, changing its attachment, refining a binding edge or reviewing a decoration backing. Each change still needs to preserve the information or function that component provides. Removing a required label or weakening an attachment is not an adequate comfort solution.
Keep the final description accurate. If the improvement concerns the reverse of an embroidered badge, describe that construction rather than claiming the body fabric has become softer. Precise language helps both development and marketing. It also prevents future reviewers from changing the wrong material when they try to reproduce the approved wearing experience.
A worked example: one underarm point feels firm
Imagine a training shirt whose main fabric feels comfortable, but one underarm point becomes noticeable during arm swings. The long side seam is otherwise unobtrusive. This hypothetical example shows how a narrow observation can guide a useful revision without redesigning the entire shirt.
Inspect the junction inside out and compare both sides. Record the layers arriving at the point, the allowance direction and any reinforcement. Check whether the issue repeats in another sample of the same version. A local assembly inconsistency and a consistently bulky design require different conversations, even if the wearer describes both as rubbing.
The technical team might propose a revised allowance treatment or a modest change to the intersection arrangement. Make the comparison on the same fabric and fit where practical. If several construction details must change together, record them clearly rather than pretending the trial isolates one variable.
Return to the same relevant movement and ask about the original point. Also inspect any new junction created by the revision. If comfort improves, confirm that the seam still meets the required appearance and structural expectations. The outcome is a better-supported construction choice for that garment, not proof that one seam type is universally comfortable or that every wearer will have the same experience.
Is an inside-out photograph enough to approve comfort?
It is a useful inspection tool, especially for finding allowances, labels and junctions that exterior images hide. It cannot reproduce touch, movement or the way the garment fits a particular body. Use it to document construction and identify questions for the physical review.
A photograph also needs context. Include the whole relevant region as well as the close detail, and avoid compressing or flattening the seam to make it look lower. The image should help another reviewer locate the contact feature on the actual garment. Comfort approval then draws on the relevant wearing observations and technical requirements, with the photograph preserving what was built.
Turn wearing feedback into a reproducible construction
The approved sample should carry more than a note saying comfortable. Record the seam construction, relevant thread and fabric references, panel orientation and internal finishing. Photograph the contact areas and junctions that mattered during development. This makes the result available to someone who did not participate in the fitting sessions.
Preserve the feedback in specific terms. Identify the movement, location and conditions under which the revised sample was preferred. Keep any unresolved concerns visible, especially where only one size or a small wearer group has been reviewed. This is practical evidence, not a universal guarantee.
For public product language, describe features that can be verified: a particular internal finish, a reduced local seam stack or a repositioned junction. Use broader comfort claims only to the extent supported by appropriate evidence. The construction should explain why the design deserves consideration without promising an experience that no single stitch arrangement can guarantee for everyone.
Make the smallest targeted change
A sensible correction might involve moving a seam, reducing bulk at a junction, changing a thread or revising the edge finish. Keep the rest of the sample consistent so the next wear review can assess that change.
When describing the final garment, state the verified construction clearly. “Low-profile underarm seam” is a physical feature that can be checked. “Never chafes” is a much broader claim that the stitch construction alone cannot establish.
Technical references and question evidence
- TechnicalCoats: Soft and Secure Seams
- TechnicalCoats: Eloflex stretch-seam information
- Question evidence onlyRunner describes rubbing at underarm seam
- Question evidence onlyRunner discusses inseam discomfort
Technical references support the discussion method. Question evidence documents public discussion of an issue; it does not diagnose a KITOEM product or establish a test result.